上一篇《OpenCV3-Python卡尔曼滤波器介绍》介绍了OpenCV中Kalman滤波器,本篇来介绍CAMShift算法结合Kalman滤波器来实现行人跟踪的方法。
应用程序遵循以下流程:
<1> 检测第一帧;
<2> 检测后面输入的帧,从场景的开始通过背景分割器来识别场景中的行人;
<3> 为每个行人建立ROI,并利用Kalman/CAMShift来跟踪行人ID;
<4> 检查下一帧是否有进入场景的行人;
1. 类Pedestrian介绍
class Pedestrian():

  """
  Pedestrian class
  each pedestrian is composed of a ROI, an ID and a Kalman filter
  so we create a Pedestrian class to hold the object state
  """

  def __init__(self, id, frame, track_window):

    """init the pedestrian object with track window coordinates"""

    # set up the roi
    self.id = int(id)
    x,y,w,h = track_window
    self.track_window = track_window
    self.roi = cv2.cvtColor(frame[y:y+h, x:x+w], cv2.COLOR_BGR2HSV)
    #计算ROI的直方图
    roi_hist = cv2.calcHist([self.roi], [0], None, [16], [0, 180])
    self.roi_hist = cv2.normalize(roi_hist, roi_hist, 0, 255, cv2.NORM_MINMAX)

    #设置卡尔曼滤波器
    self.kalman = cv2.KalmanFilter(4,2)
    self.kalman.measurementMatrix = np.array([[1,0,0,0],[0,1,0,0]],np.float32)
    self.kalman.transitionMatrix = np.array([[1,0,1,0],[0,1,0,1],[0,0,1,0],[0,0,0,1]],np.float32)
    self.kalman.processNoiseCov = np.array([[1,0,0,0],[0,1,0,0],[0,0,1,0],[0,0,0,1]],np.float32) * 0.03
    self.measurement = np.array((2,1), np.float32)
    self.prediction = np.zeros((2,1), np.float32)
    self.term_crit = ( cv2.TERM_CRITERIA_EPS | cv2.TERM_CRITERIA_COUNT, 10, 1 )
    self.center = None

    #传递当前帧
    self.update(frame)

  def __del__(self):
    print ("Pedestrian %d destroyed" % self.id)

  def update(self, frame):
    # print "updating %d " % self.id
    hsv = cv2.cvtColor(frame, cv2.COLOR_BGR2HSV)
    back_project = cv2.calcBackProject([hsv],[0], self.roi_hist,[0,180],1)

    #根据传递的参数,选择采用CAMShift/均值漂移
    if args.get("algorithm") == "c":
      ret, self.track_window = cv2.CamShift(back_project, self.track_window, self.term_crit)
      pts = cv2.boxPoints(ret)
      pts = np.int0(pts)
      self.center = center(pts)
      cv2.polylines(frame,[pts],True, 255,1)

    if not args.get("algorithm") or args.get("algorithm") == "m":
      ret, self.track_window = cv2.meanShift(back_project, self.track_window, self.term_crit)
      x,y,w,h = self.track_window
      self.center = center([[x,y],[x+w, y],[x,y+h],[x+w, y+h]])
      cv2.rectangle(frame, (x,y), (x+w, y+h), (255, 255, 0), 2)

    #Updates the predicted state from the measurement.
    self.kalman.correct(self.center)

    #Computes a predicted state.
    prediction = self.kalman.predict()

    cv2.circle(frame, (int(prediction[0]), int(prediction[1])), 4, (255, 0, 0), -1)

    # fake shadow
    cv2.putText(frame, "ID: %d -> %s" % (self.id, self.center), (11, (self.id + 1) * 25 + 1),
        font, 0.6,
        (0, 0, 0),
        1,
        cv2.LINE_AA)
    # actual info
    cv2.putText(frame, "ID: %d -> %s" % (self.id, self.center), (10, (self.id + 1) * 25),
        font, 0.6,
        (0, 255, 0),
        1,
        cv2.LINE_AA)
2. 主函数内容
#! /usr/bin/python

"""Surveillance Demo: Tracking Pedestrians in Camera Feed

The application opens a video (could be a camera or a video file)
and tracks pedestrians in the video.
"""
__author__ = "joe minichino"
__copyright__ = "property of mankind."
__license__ = "MIT"
__version__ = "0.0.1"
__maintainer__ = "Joe Minichino"
__email__ = "joe.minichino@gmail.com"
__status__ = "Development"

import cv2
import numpy as np
import os.path as path
import argparse

parser = argparse.ArgumentParser()
parser.add_argument("-a", "--algorithm",
    help = "m (or nothing) for meanShift and c for camshift")
args = vars(parser.parse_args())

def center(points):
    """calculates centroid of a given matrix"""
    x = (points[0][0] + points[1][0] + points[2][0] + points[3][0]) / 4
    y = (points[0][1] + points[1][1] + points[2][1] + points[3][1]) / 4
    return np.array([np.float32(x), np.float32(y)], np.float32)

font = cv2.FONT_HERSHEY_SIMPLEX

##################################################################
###注意:此处需要添加类Pedestrian的内容才可运行此例程,可参考1中内容###
##################################################################

def main():
  camera = cv2.VideoCapture("./768x576.avi")

  #设置20帧作为影响背景模型的帧
  history = 20

  # KNN background subtractor
  bs = cv2.createBackgroundSubtractorKNN()

  # MOG subtractor
  # bs = cv2.bgsegm.createBackgroundSubtractorMOG(history = history)
  # bs.setHistory(history)

  # GMG
  # bs = cv2.bgsegm.createBackgroundSubtractorGMG(initializationFrames = history)

  #创建主显示窗口
  cv2.namedWindow("surveillance")

  pedestrians = {}
  firstFrame = True
  frames = 0
  fourcc = cv2.VideoWriter_fourcc(*'XVID')
  out = cv2.VideoWriter('output.avi',fourcc, 20.0, (640,480))

  while True:

    print (" -------------------- FRAME %d --------------------" % frames)
    grabbed, frame = camera.read()

    if (grabbed is False):
      print ("failed to grab frame.")
      break

    fgmask = bs.apply(frame)

    # this is just to let the background subtractor build a bit of history
    if frames < history:
      frames += 1
      continue

    #通过对前景掩模采用膨胀和腐蚀的方法来识别斑点及其周围边框
    th = cv2.threshold(fgmask.copy(), 127, 255, cv2.THRESH_BINARY)[1]
    th = cv2.erode(th, cv2.getStructuringElement(cv2.MORPH_ELLIPSE, (3,3)), iterations = 2)
    dilated = cv2.dilate(th, cv2.getStructuringElement(cv2.MORPH_ELLIPSE, (8,3)), iterations = 2)

    image, contours, hier = cv2.findContours(dilated, cv2.RETR_EXTERNAL, cv2.CHAIN_APPROX_SIMPLE)

    #对第一帧中的行人轮廓进行实例化
    counter = 0
    for c in contours:
      if cv2.contourArea(c) > 500:
        (x,y,w,h) = cv2.boundingRect(c)
        cv2.rectangle(frame, (x,y), (x+w, y+h), (0, 255, 0), 1)
        # only create pedestrians in the first frame, then just follow the ones you have
        if firstFrame is True:
          pedestrians[counter] = Pedestrian(counter, frame, (x,y,w,h))
        counter += 1

    #对于检测到的行人,都执行update()函数来传递当前帧
    for i, p in pedestrians.items():
      p.update(frame)

    #只跟踪第一帧中已有的人
    firstFrame = False
    frames += 1

    cv2.imshow("surveillance", frame)
    out.write(frame)
    if cv2.waitKey(110)  & 0xFF == ord('q'):
        break
  out.release()
  camera.release()
  cv2.destroyAllWindows()

if __name__ == "__main__":
  main()
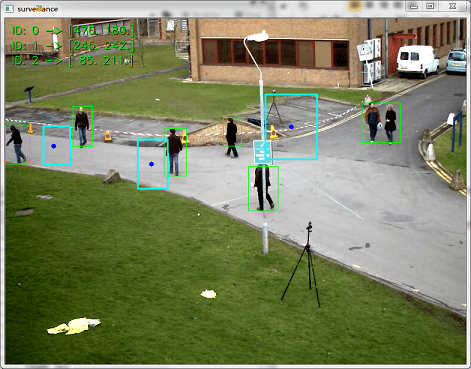
3. 实验结果